
Air Conditioning Articles
Air Conditioning FAQs

Why is my A/C not blowing cold air?
One of several things can prevent your vehicle's A/C system from blowing cold air. The most common reason for no cold air is no or low refrigerant in the A/C system (usually because of a refrigerant leak). Another cause might be that your A/C compressor is not engaging when you turn the A/C on. The underlying cause for this could be low refrigerant in the system, a defective compressor clutch, or a blown compressor clutch fuse. Another possible cause of no cooling could be a defective or stuck air flow control flap inside the HVAC system that prevents air from circulating through the A/C evaporator core. The system is cooling but the cold air is not being routed into your vehicle.
For additional help see Troubleshooting an A/C system that blows warm air
Why is my A/C system low on refrigerant?
A/C systems are pressurized and are not supposed to leak. But over time, seals and hoses can deteriorate allowing refrigerant to leak. The compressor shaft seal is a common leak point. Other places were refrigerant can leak include the A/C condenser in front of the radiator, or the A/C evaporator inside the HVAC plenum under the dash.
How can I find a refrigerant leak?
Look for oily residue on the outside of refrigerant hoses or where hoses and pipes connect to other components in the system. Oily streaks radiating outward from the front of the A/C compressor would indicate a leak shaft seal. Look for damage to the A/C condenser caused by rocks or other road debris. Leaks in the evaporator core are impossible to see because of its hidden location inside the HVAC system, so an electronic leak detector may be needed to reveal such a leak.
If the A/C system still contains some refrigerant or has been recharged, turn the system on and spray soapy water on suspected leak points. If you see bubbled, you have found the leak.
Refrigerant that contains colored or UV dye can also be added to an A/C system to find a leak. Run the A/C for 20 minutes or so to give the dye plenty of time to circulate, then look for telltale dye stains on hose and plumbing connections, around the compressor and condenser.
How do I fix an A/C refrigerant leak?
The right way to fix a leak is to replace the leaky component (hose, o-ring seal, compressor, condenser or evaporator). However, some small leaks can be sealed by adding a sealer product designed for use in an A/C system. The sealer will circulate with the refrigerant and hopefully plug the leak, saving the labor and cost of replacing system components.
Can I recharge my A/C system myself?
Yes. Most auto parts stores sell do-it-yourself A/C recharging kits that include a hose connector and valve for attaching a can of refrigerant to the LOW PRESSURE service port on your A/C system. Just make sure you make the connection to the LOW PRESSURE service port, not the HIGH PRESSURE port which could cause the can of refrigerant to explode! Wear eye protection and avoid skin contact with any refrigerant that might leak out of the can because it can cause frostbite.
Once the can is connected to the LOW side of the A/C system, start the engine, turn the A/C on and open the valve that allows refrigerant to flow from the can into the system. It's a slow process that can take 10 to 15 minutes or longer depending on the ambient temperature and how much refrigerant is in the system.
For step-by-step instructions, see How To Recharge Your Car's Air Conditioner.
Can I replace a bad A/C compressor myself?
Yes. But you are not supposed to intentionally vent any refrigerant that may still be in the A/C system into the atmosphere. A repair facility with a refrigerant recovery machine can capture the refrigerant for recycling and reuse. If there is no refrigerant in the system, then replacing the A/C compressor is a simple matter of disconnecting the hoses and drive belt from the compressor, then removing the compressor and installing the new one in its place.
Once the new compressor is installed and all the hoses have been reconnected, the A/C system needs to be vacuum purged to such out all the air and moisture from the system. This is absolutely essential before you recharge the system with refrigerant. If the air is not removed, it will prevent the system from accepting a full charge of refrigerant, resulting in poor cooling. Also, moisture is a contaminant that can form acids and sludge that can damage a new compressor.
Be sure to add the specified amount of the correct compressor oil for your vehicle. The oil can be added with the refrigerant through the LOW side service port.
How hard is it to replace an A/C evaporator core?
It is a time-consuming and difficult job because it requires a lot of disassembly. The evaporator core is located inside the HVAC unit behind the dash, so the dash usually has to be removed to access and open up the HVAC plenum assembly. The job can easily take 6 to 8 hours or more. We recommend leaving this job to a professional.
I have an older vehicle with an R-12 A/C system. It needs refrigerant but I can't find any R-12. What can I do?
R-12 has been out of production for many years, so your only repair options are to use an alternative R-12 refrigerant, or to convert your R-12 system to R-134a. The alternative refrigerants are drop-in substitutes for R-12 so you should encounter no problems. Avoid any that are classified as flammable (which are illegal in most states).
Converting to R-134a may or may not be a simple matter of substituting one refrigerant for another. R-134a is chemically different than R-12 and does not cool quite as well when used in an R-12 system. It also requires a different compressor oil (PAG or POE oil instead of mineral oil).
For more information about converting an older R-12 system to R-134a, see R-134a Retrofit Guide.
Why did R-134a replace R-12?
R-12 was used up until the mid 1990s in all automotive A/C systems because it cooled well. But it has a major drawback: it was a CFC that contained chlorine. If it leaked into the atmosphere, the chlorine caused damage to the Earth's protective ozone layer. When this was discovered, the decision was made to phase it out and replace it with a non_CFC refrigerant. R-12 is no loner produced in the U.S.
R-134a was introduced as the chlorine-free ozone friendly replacement for R-12 in 1992, and because standard in 1995 on all cars and light trucks in the U.S. R-134a does not cool quite as efficiently as R-12, but its pretty close. Unfortunately, it was later discovered that R-134 is a potent global greenhouse gas that contributes to global warming the same as carbon dioxide. So the decision was made to phase it out and replace it with yet another refrigerant R-1234yf.
As long as R-134a remains sealed inside an A/C system, it causes no environmental harm. But if it escapes and enters the atmosphere because of a leak or an accident that punctures the A/C condenser, it adds to the global warming problem. The small amount of refrigerant (less than 1 to 2 lbs. in most cases) that would leak from a typical automotive A/C system is not a big deal in itself, but when you consider that the world vehicle population now exceeds 1 BILLION vehicles, it can add up because the Global Warming Potential (GWP) rating of of R-134a is 1300 times higher than carbon dioxide.
Currently, there are no plans to ban the production of R-134a, so if you need R-134a refrigerant later on it should always be available.
Why did R-1234yf replace R-134a?
R-1234yf is the latest "environmentally friendly" refrigerant to go widespread use. It contains no CFCs (ozone friendly), has a substantially lower Global Warming Potential (GWP) rating of 4 compared to 1300 for R-134a, and is mostly nonflammable (except under certain unlikely conditions). R-1234yf also breaks down faster than R-134a if it leaks into the atmosphere (11 days versus 13 years for R-134a!).
R-1234yf as first used in a few 2013 and 2014 model year vehicles, but has since been added to more and more late model vehicles. R-1234yf A/C systems can be identified by a service label under the hood and different service fittings.
However, R-1234yf does not cool as efficiently as R-134a or R-12, so it requires some changes in the A/C system such as a more efficient condenser, a pipe-style receiver-dryer on the condenser rather than an accumulator and orifice tube, and slightly different operating pressures. A special type of PAG compressor oil is also required for R-1234yf compressors, as well as a J2843 compliant refrigerant recovery machine for recovering refrigerant from the A/C system.
NOTE: R-1234yf is way more expensive than R-134a, so you may be tempted to substitute R-134a for R-1234yf if your A/C system needs refrigerant. The auto makers do NOT recommend using anything other than R-1234yf in a late model A/C system that was designed for R-1234yf. R-134a will work but possibly not as well as R-1234yf.
Also the type of PAG oil required for a R-1234yf system is different than the PAG oils used in R-134a systems. Using the wrong oil may damage the A/C compressor. Refer to the A/C service decal or your owners manual for the correct type of PAG oil to use in your A/C system.
For more information see HFO-1234yf Refrigerant.
A/C Cooling Problem: Blows Warm Air Only No Cool Air
Troubleshooting Air Conditioning Problems
Troubleshoot Automatic Climate Control
Troubleshooting A/C Cooling Problems with Temperature
How To Recharge Your Car's Air Conditioner
Refrigerant Contamination
Alternative Refrigerants for R-12
Watch Out for Flammable Refrigerants
New Automotive Refrigerants
Information about Retrofitting older vehicles with R-12 A/C systems to R-134a
HFO-1234yf Refrigerant
A/C Compressor Failures
A/C Condenser Flushing
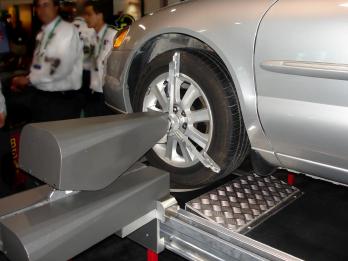
Wheel Alignment
TOE WHEEL ALIGNMENT
Toe is the most important wheel alignment angle because it has the greatest effect on tire wear. Toe refers to the parallelism between the wheels as viewed from above and is usually measured in inches or millimeters. When both front wheels are aimed straight ahead and the distance between the leading edges of both front tires is exactly the same as the distance between the trailing edges, the wheels have "zero toe" and are theoretically aligned. We say in theory because toe alignment changes when the vehicle is being driven.

The joints and sockets in the suspension and steering linkage all have a little play, which when added together can allow wheel alignment to change depending on how the steering and suspension are loaded. Likewise, the rubber bushings in the control arms have some compliance and deflect slightly when the vehicle accelerates, brakes, turns and cruises. This too can allow toe alignment to change. To compensate, a little bit of "toe-in" or "toe-out" may be added when the wheels are aligned depending on whether the vehicle has front- or rear-wheel drive.
Toe-in means the front edges of the tires are closer together than the rear edges. Most rear-wheel drive cars and trucks have alignment specifications that call for a little bit of toe-in (say 1/16th of an inch or so). This will produce zero rolling toe as the vehicle is being driven down the road because the natural tendency for the front and rear wheels is to toe-out due to rolling resistance and compliance in the steering and suspension.
Toe-out is when the front edges of the tires are farther apart than the rear edges. This may occur if the tie rod ends are worn, or if the control arm bushings have collapsed. Toe-out is a bad condition to have because it causes the tires to scrub as they roll along. Only 1/8th inch of toe-out will scrub the tires sideways 28 feet for every mile driven. At this rate, it doesn't take long to wear down the tread.
A classic symptom of toe misalignment is a feathered wear pattern across both front tires. The direction of the feathering tells you if the tires are toed-in or toed-out (rough edges towards the inside signal toe-in while rough edges to the outside indicate toe-out). But on radial tires, toe misalignment tends to roll the shoulder of the tire under as it scrubs producing wear on the inner or outer ribs only. Toe-in will wear the outer rib while toe-out will cause wear on the inner rib. In both instances, wear can be aggravated even more if the tires are underinflated.
Replacing the tires may replace the worn rubber, but it won't eliminate the tire wear problem. The new tires will suffer the same fate unless the cause of the misalignment is identified and toe is reset to specifications. So anytime the tires show toe wear, toe alignment should be checked to see if it is out of range. Also, the steering should be inspected for worn or bent parts. In addition to checking for loose or worn tie rod ends, look for bent steering arms or tie rods because either can cause toe wear, too.
Strange as it may seem, on some front-wheel drive cars and minivans, a slight amount of toe-out (up to about 1/16th inch) may be specified when aligning the wheels to compensate for toe-in that occurs as the front wheels pull the vehicle down the road. Drive torque more than offsets the compliance in the steering and suspension allowing both front wheels to toe-in slightly when accelerating. This is also what causes "torque steer" (a sudden steering pull) in some FWD cars that have unequal length halfshafts. Under hard acceleration, the left wheel with the shorter halfshaft experiences more toe-in than the right wheel with the longer halfshaft. The result is unequal toe changes and a steering pull to the right. Vehicle manufacturers have reduced or eliminated torque steer in many FWD cars by using equal length halfshafts and/or stiffer control arm bushings.
HOW WORN PARTS AFFECT TOE ALIGNMENT
Worn or loose tie rod ends should always be replaced. But new tie rod ends won't necessarily cure a tire wear problem unless the tie rods are properly adjusted after the new parts have been installed.
Changing the tie rod ends, tie rods or a steering rack will change the distance between the steering arms, which changes toe. So after the parts have been installed, some type of alignment equipment must be used to measure toe. Then and only then can the tie rods be adjusted to set toe within the vehicle manufacturer's specifications (always use the specs listed in an alignment reference manual or service manual, never "rule of thumb" settings, because every vehicle is unique).
One old mechanic's trick when replacing tie rod ends is to count the number of turns it takes to unscrew a tie rod end, then to use the same number of turns when screwing it back on. This only works if the same tie rod end is being reinstalled because the length of the tie rod end and threading may be different on a new part. What's more, there's no way to know if the original alignment setting was correct or not. That's why toe should always be measured and readjusted as needed after parts have been replaced.
Something else to keep in mind about toe is that rear toe is just as important on front toe -- especially if a vehicle has an independent rear suspension or rear toe adjustments. This includes most front-wheel drive cars and minivans as well as some rear-wheel drive cars. Rear toe misalignment can cause toe wear on both the front and rear tires by creating a steering pull to one side. Unlike front toe which is self-centering because of the steering linkage, a difference in rear toe angles side-to-side creates something called a "thrust angle." The result is the same as rear axle misalignment that causes the vehicle to pull or lead to one side.
So how does this cause wear in the front tires? Because we forgot to tell you that front toe changes slightly anytime the wheels are steered to either side. Because the inside wheel follows a shorter arc than the outside wheel, the steering arms are angles slightly so the wheels tow-out with respect to one another when the wheels are turned to one side. The amount of toe-out is only a couple of degrees, but it helps to minimize scuffing and tire wear. If the rear wheels are misaligned, though, and the driver has to constant steer off-center to keep the vehicle going straight, it means the front wheels are constantly toed-out. Over a period of time, this will cause toe wear to appear on the front tires. The cure? Check and realign rear toe as needed.
Rear-wheel drive cars and trucks that do not have independent rear suspensions have fixed rear toe settings, so no adjustments are possible. But on most other vehicles, rear toe can be adjusted either by using factory adjustments (where available) or by installing aftermarket alignment aids such as toe/camber shims, offset bushings, etc.

CAMBER WHEEL ALIGNMENT
The next important wheel alignment angle you should know something about is camber. Camber refers to the tilt of the wheels as viewed from the front or rear. Camber is the inward (negative) or outward (positive) tilt of the wheels. It is usually measured in degrees.
As with toe, zero camber (perfectly perpendicular to the road) is the ideal alignment setting. But like toe, camber changes as the vehicle is being loaded and every time the vehicle encounters a bump or dip in the road. The up and down motions of the suspension change the geometry of the control arms and struts, which causes camber to change. So many static camber alignment specifications may allow up to a degree of more of positive or negative camber depending on the design of the suspension. As a rule, camber settings should usually be within half a degree side-to-side.
If camber is out of specs, a tire will wear unevenly on one shoulder and the vehicle may pull toward the side with the most camber. Camber usually only affects one wheel, so if only one tire shows unusual shoulder wear it is usually a symptom of camber misalignment.
Keep in mind that camber applies to both front and rear wheels, though only vehicles with independent rear suspensions typically have rear camber alignment specifications. Most rear-wheel drive cars and trucks with solid axles do not have rear camber specifications because there's no way to change it (even so, a bent rear axle can cause a camber problem!).
Excessive camber can be caused by a bent spindle, mislocated strut tower, bent strut, worn or collapsed control arm bushing, bent control arm or a weak or broken spring. If any of these parts are replaced, camber should be checked and adjusted as needed after the parts have been installed. And of vehicles that do not have camber adjustments on the struts or control arms, or provide only a limited amount of adjustment, there are aftermarket camber adjustment aids that can help.

CASTER WHEEL ALIGNMENT
The third most important wheel alignment angle is caster, which is the forward (negative) or rearward (positive) tilt of the steering axis as viewed from the side. Caster is usually measured in degrees, and only applies to the front wheels because they are the only ones that steer (except for the few oddball Japanese cars that had four-wheel steering).
Caster is a weird angle because it doesn't affect tire wear directly. It's greatest effect is on steering stability, steering effort and steering return. So it is often the most ignored angle.
Most vehicles have a small amount of positive caster to provide quick steering return and high speed stability. This happens because caster forces the spindle to angle down slightly as the wheels turn. This lifts the chassis and brings more weight to bear on the wheels as they turns. The net effect is that caster helps keep the wheels aimed straight ahead for improved steering stability, and helps the wheels return to the straight ahead position after turning. Many European luxury sedans have a lot of caster for this very reason because it provides a more stable feel at highway speeds. The downside is that it increases steering effort and steering feedback to the driver.
What happens if caster is out of specifications? If there is too much difference in caster side-to-side, it can cause a vehicle to drift or lead to one side. Some alignment specs call for a slight difference in caster to compensate for road crown. But as a rule, caster should usually be within half a degree side-to-side.
The same kind of problems that can cause camber misalignment can cause caster misalignment: a bent spindle, mislocated strut tower, bent strut, worn or collapsed control arm bushing, bent control arm or a weak or broken spring. So if any of these parts are replaced, caster should be checked and readjusted as necessary after the parts have been installed.
Ride height can also affect caster. Spring sag or overloading a vehicle can alter ride height up to several inches, which can change caster readings by up to a degree or more. This may contribute to steering instability or change steering effort. So checking ride height is also an important element of aligning the wheels. If ride height is below specifications, weak springs should be replaced. Upgrade opportunities here include installing variable rate springs, air springs, overload shocks or air-assist shocks on a vehicle that is used for towing or hauling heavier than normal loads.
CHECKING WHEEL ALIGNMENT
The only way to make sure the wheels are properly aligned is to check wheel alignment periodically. Once set wheel alignment should not change unless parts become worn or damaged. Likewise, it makes no sense to attempt to realign the wheels until worn or damaged parts have been replaced. Worn parts will not hold an accurate alignment because they have too much play. There's also the danger that a component failure could result in the collapse of the suspension and/or loss of steering control (a broken ball joint or tie rod end, for example).
Most experts recommend an annual alignment check, or to check wheel alignment when the tires are replaced. Even new vehicles can benefit from an alignment check if the wheels were not properly adjusted at the factory. Some factory specifications allow a rather wide range of settings, which may provide less than ideal tire wear and handling characteristics. Setting the wheels to the "preferred" or mid-range settings often gives the best results.
Most shops today promote four-wheel alignments as opposed to two-wheel (front only) alignments. Why? Because all four wheels influence directional stability, steering and handling. Four-wheel alignments are more expensive, take a little longer and require more sophisticated equipment, but should be considered a must for most front-wheel drive cars and minivans as well as rear-wheel drive cars with independent rear suspensions.
More Wheel Alignment Related Articles:
How To Align The Unalignable
Aligning Light Trucks & SUVs
Correcting Steering Pulls
Torque Steer in FWD Cars
Fixing Common Alignment Problems
Blame It On The Tires
Tire Wear (What to look for, how to reduce it)
Tire Rotation: When & How To Rotate Your Tires
How To Inspect Your Car's Suspension
Diagnosing ride control complaints (Shocks & Struts)
Ball Joints: Inspection & Replacement Tips
Getting The Right Attitude: Restoring Ride Height

 Traduction


Leave a Comment